
tcpGPS
Selection of coordinate system - GPS v2
4.3 Selection of coordinate system
ISO Standard 19111, Geographic information - Spatial referencing by coordinates, defines the conceptual scheme for the description of spatial referencing through coordinates. Describes the necessary data to define the reference systems of one, two- and three-dimensional coordinates as well as the information needed to convert coordinates from one system to another.
According to this Standard, a coordinate reference system is composed of a coordinate system and a datum. Of the different types of datums that distinguish the Standard, the Geodetic Datums and the Vertical Datums are the ones that will be used in this module. The former requires the description of an Ellipsoid and the latter do not.
Based on this classification, two groups of coordinate reference systems have been created: Geodetic SRC and the Vertical SRC.
The Geodetic SRCs are divided into different types. Based on the classification of ISO 19111 and the classification made by the EPSG (European Petroleum Survey Group, www.epsg.org, http://www.epsg.org/now the OGP, International Association of Oil & Gas Producers) in its database, we will distinguish: the SRC Geographical, the SRC Geocentric and the SRC Projected.
To start working on a project, it is essential to define in which coordinate system the points and geographic data will be represented.
Clicking on the button  displays a list of coordinate systems that have previously been configured in the application.
If you want to add a new one, click on  .
Once the coordinate system is selected from the list, it will be assigned to the project by clicking on the button  .
The coordinate system could be also deleted using the button  .
If you use a coordinate system frequently, it can be set as your default coordinate system of your new projects by selecting it from the list and pressing the button  .
It is possible to edit the name of the coordinate system by selecting a coordinate system from the list and pressing the  button. This will change the name in all existing projects, as well.
Creating a coordinate system
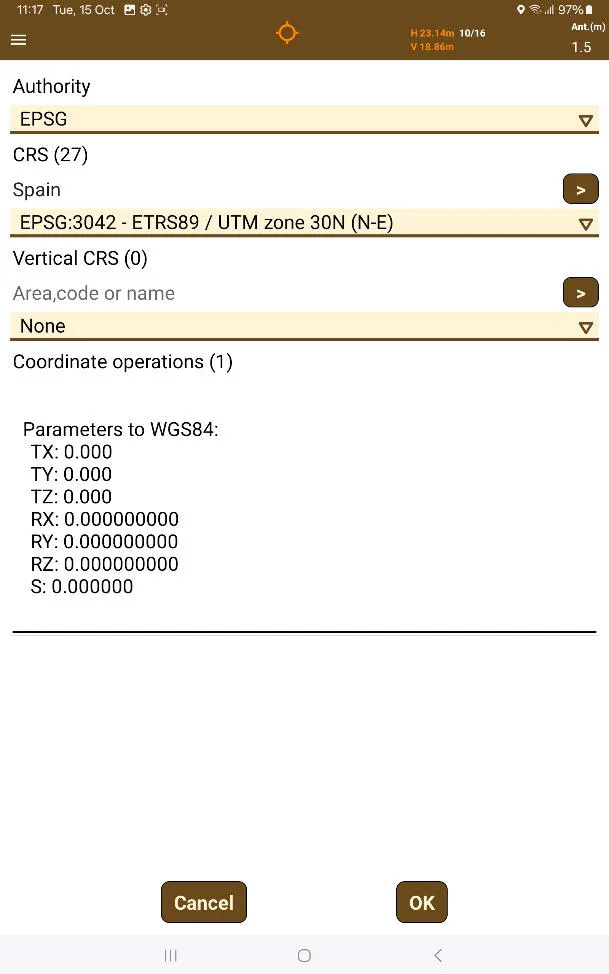
After touching the button, the CRS creation screen will appear.
 |
|---|
Figure 21. CRS Creation Screen |
First, it's possible to choose the Authority between these:
EPSG
ESRI
IGNF
USER
EPSG is the default, as the one that has the most data. USER will contain special CRS as well as RTCM based CRS.
It's possible to filter through CRS and Vertical CRS by using the textboxes. It's possible to filter through name, code, or country, as show in the previous image.
Horizontal CRS
The CRS must have a horizontal CRS or just "CRS". It is not possible to have a CRS without this, and UTM zone 1N will be selected by default if nothing is chosen.
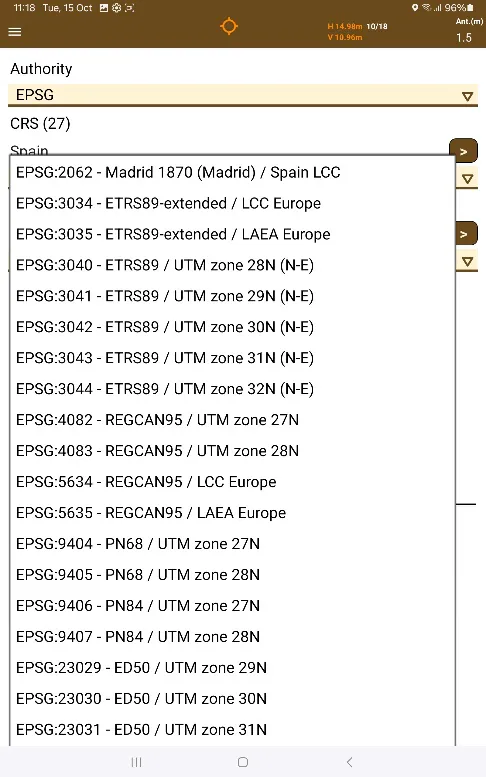
After typing in the code, name, or country, it is possible to choose whichever CRS is applicable regarding the physical location of the project and the desired projection.
 |  |
|---|---|
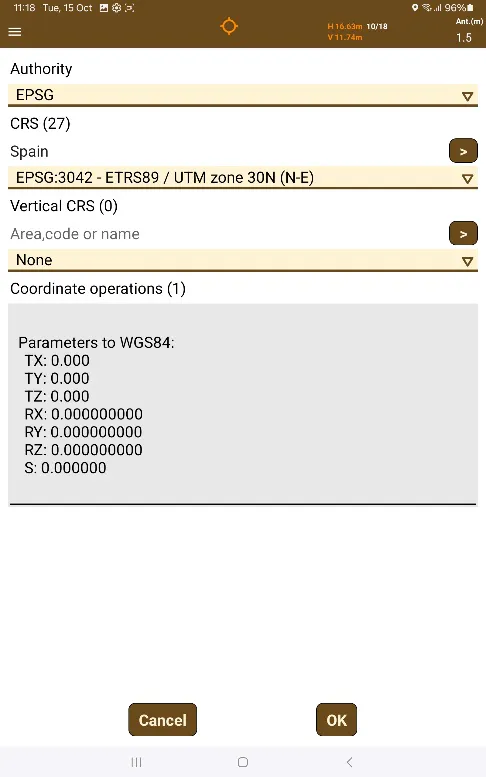
Figure 22. Spain CRS list | Figure 23. Chosen Coordinate Operation |
Choosing the CRS will populate the Coordinate Operations list, which is able to be touched to select one to finish creating the CRS.
Vertical CRS
After searching for a country, code, or name of a vertical CRS, it'll be possible to change from "Nothing" to a vertical CRS. If the horizontal CRS is incompatible with the selected vertical CRS, nothing will appear in the Coordinate Operations list. If a Vertical CRS is chosen and there's a desire to remove it, you can go back to "Nothing".
If it is compatible, Coordinate Operations using Geoid files will appear on the list.
If the Geodesy file is not in the device, it will show the words "(Download available)". After the Coordinate Operation is touched in the list, a Download Files button  will appear. If it is touched, a small message saying "Downloading files..." will appear. After the message "(1)" appears after, the file has been downloaded, it is then now possible to finalize creating the CRS.
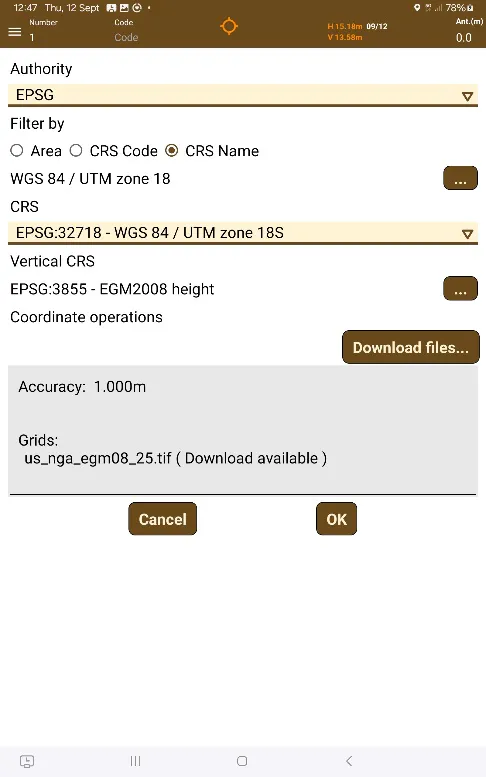 | 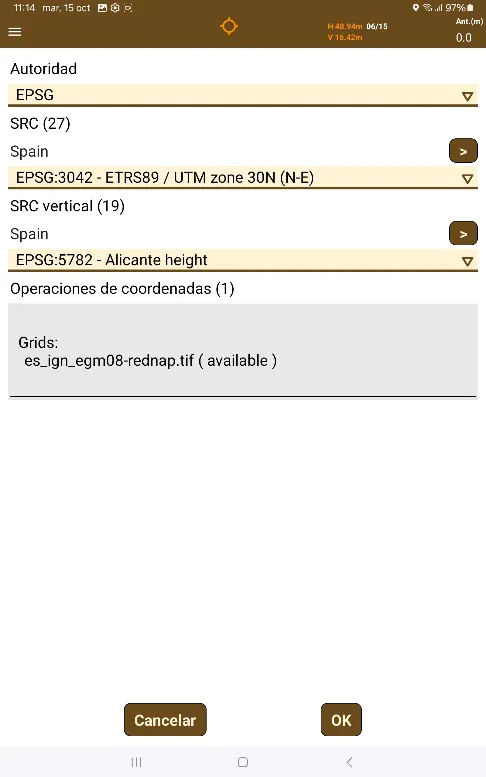 |
|---|---|
Figure 24. Vertical CRS Coordinate Operations | Figure 25. Vertical CRS Geoid File Downloaded |
Finishing creating a CRS
Once a Coordinate Operation has been chosen (this is obligatory), the OK button can be pressed. 
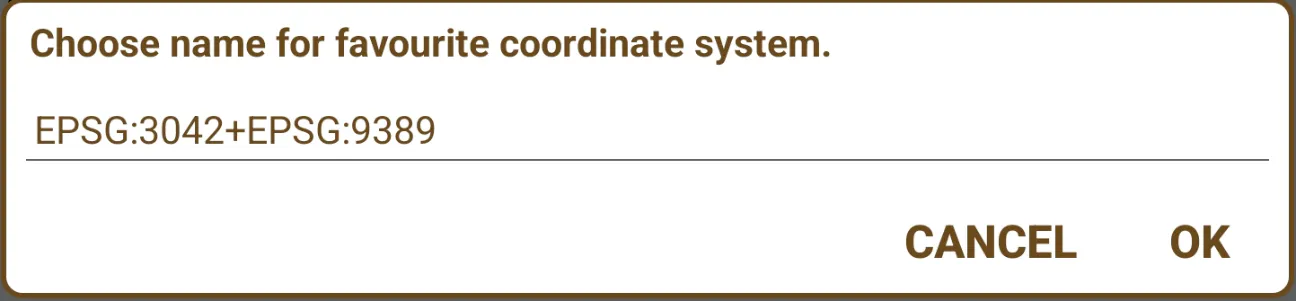
A dialog for inserting the name of the coordinate system created will appear.
 |
|---|
Figure 26. CRS Naming Dialog |
A name including the codes of the selected CRS will be displayed by default, but it can be changed to anything.
There can't be two CRS with the same name in the application.
Creating a coordinate system from RTCM messages
For countries in which NTRIP servers send RTCM transformation messages alongside real-time corrections, it is possible to create a coordinate system with the info contained in said messages.
The supported messages are 1021, 1023, 1025, 1026, 1027. In case of message 1025, only the following projections are allowed:
Transverse Mercator (EPSG:9807)
Lambert Conic Conformal 1SP (EPSG:9801)
Lambert Conic Conformal 2SP (EPSG:9802)
Cassini-Soldner (EPSG:9806)
Oblique Mercator (EPSG:9815)
Oblique Stereographic (EPSG:9809)
Creating RTCM CRS
To access the creation of RTCM CRS, an external GNSS device must be connected and then accessing the receiver configuration. When configuring the receiver, after accessing the Rover option  , the NTRIP tab should be selected. After pressing the
 button, the NTRIP dialog box will appear.
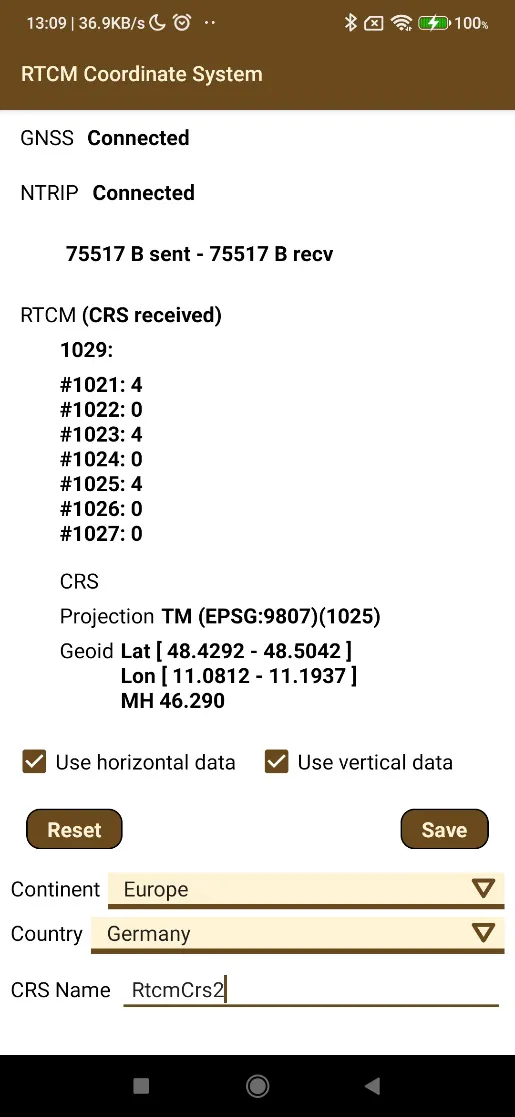
At the bottom of it, there is a checkbox titled "Analyze CRS RTCM". Once checked, that will give access to the "Create CRS RTCM" button". Pressing it will reveal the RTCM screen.
 |
|---|
Figure 27. RTCM Coordinate System Creation |
The data presented are:
Continent/Country: Shows the selected area where the coordinate system will be stored. It is important selecting the correct are so the new system will be shown in the list.
GNSS: Connection status with GNSS receptor.
NTRIP: Connection status with the NTRIP server.
RTCM: Coordinate system status, which can be waiting for coordinate system or coordinate system received. The following are shown: The content of the RTCM 1029 message and the number of received messages from 1021 to 1027.
CRS: Name of the system that the server sends.
Projection: Name of the used projection.
Geoid: Information of the area where the geoid is valid and the average geoidal separation.
Use horizontal data: Indicates whether the geodesic CRS should be created or not.
Usar vertical data: Indicates whether the geoid should be created or not.
Reset: Restarts the data capture to create the coordinate system.
Save: This button will be enabled when the system has been received and it allows it to be saved in the geodesic local database for later use, with a name the user has selected.
Using RTCM CRS
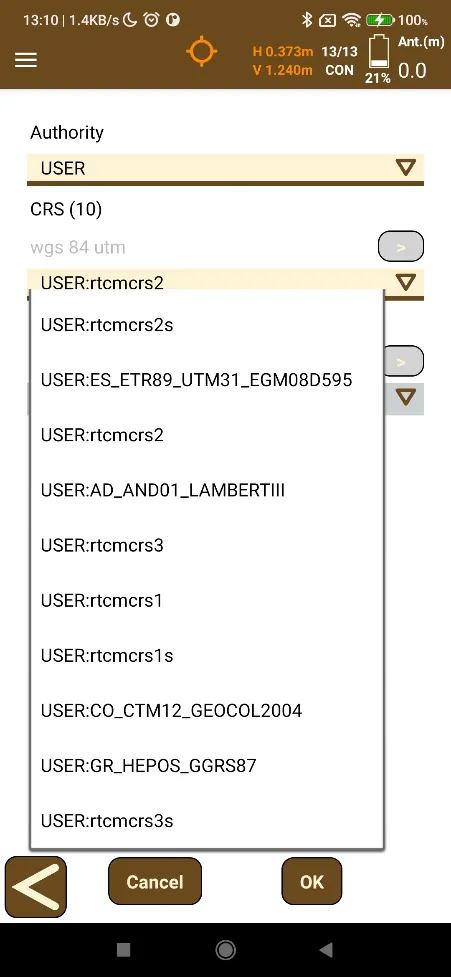
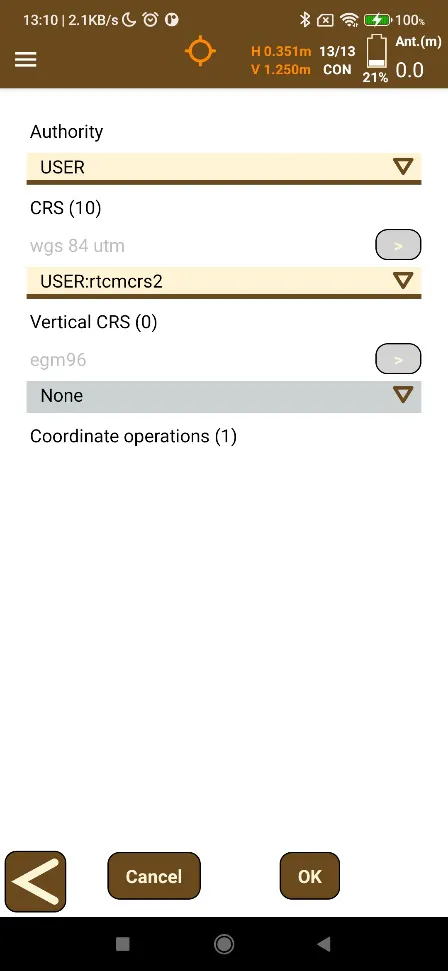
After creating the RTCM CRS with the preferred name, it can be selected by choosing the USER Authority. Afterwards, it will appear inside the dropdown selection menu for CRS.
There is no need to choose a Coordinate operations. It's possible to press OK directly, and this will save the RTCM CRS to be able to be selected for a project.
 |  |
|---|---|
Figure 28. List of User CRS, including the created RTCM | Figure 29. User CRS selected, ready to press OK to save |
Importing Geodesy Files
tcpGPS allows for importing of new Geodesy files to be used with new Coordinate Systems, by accessing Import > Geodesy in the menu. The Android File Explorer, SAF, will open allowing you to choose .dat, .gde, .gsb and .db files. Please be mindful that usage of these imported Geodesy files is under the user's responsibility. They cannot be deleted later except by uninstalling the application.