
tcpMDT
Offset to the next vertex - MDT25
10.10 >: Offset to the next vertex.
>> : Offset to the last vertex.
Insert: This option allows us to insert vertices in the vertical alignment. Iteratively vertices are designated on the drawing of the grade, adding them automatically.
Common features of the three vertices
Station: Station of the vertex. If it is changed, an adjustment in X will be produced on the vertical alignment.
Elevation: Vertical alignment's elevation at the vertex. If this value is changed, the vertex of the edited vertical alignment will be adjusted in Y.
KV or Radius: Represents the parabola constant in the case of parabolic curves, or alternatively the arc radius in the case of circular curves. Modifying this information will lead to a modification of the vertical alignment's transition curve at the vertex edited.
Tangent: Represents orthogonal projection length on each alignment being modified.
Arrow: It represents the maximum ordinate at the vertex.
In addition, the following information is also displayed for the previous and next vertex.
Distance: Distance between the vertex or vertex's tangent (should it exist) and the current vertex's tangent or the vertex itself.
Slope: Slope of the vertical alignment section.
Element to Set: When the aforementioned values are entered, the possibility exists of setting the Station, the Elevation or the Slope, so that one is obliged to make modifications at the vertex while the element set is maintained.
The functions of each the dialog box's buttons are described below.
Select: This button allows us to move the transition curve of the vertical alignment being edited. It in turn has three different options:
Set Slopes
Set Previous Slope: The previous alignment to the vertex edited is set using this option. Hence, it will only be possible to move the vertex in the direction marked by the next alignment to the vertex.
Set Next Slope: This is a similar case, except that the alignment set is the one following the vertex, which can only be moved in the direction marked by the following alignment.
Set No Slope: This option allows one to arbitrarily move the vertex with no restrictions of any kind.
Tangents
These commands allow one to change the tangent points (entry and exit) of the transition curve defined at the current vertex. There are three different options.
A: If a transition curve has been defined at the previous vertex, MDT will change the tangents of the previous and current vertices so that the exit and entry tangents of both vertices coincide.
P: If a transition curve has been defined at the next vertex, MDT will change the tangents of the next and current vertices so that the exit and entry tangents of both vertices coincide.
<: When this button is clicked, MDT will graphically request the distance to the tangent to be set from the current vertex. In this case, the entry and exit tangents will be equaled.
<: Establishes as the current vertex previous vertex to the one currently being edited.
>: Establishes as the current vertex the following vertex to the one currently being edited.
Apply: Updates all the changes made on the drawing.
Once the dialogue box has been validated, all the changes made at each of the vertices will be applied to the drawing.
Pass through point
This option is explained in detail in the following section.
Current Vertex -- Other Operations
Delete: Removal of the current vertex. It is not possible to delete either the initial vertex or the end.
Center: Zooms in which is centered on the current vertex.
Up / Down: These tools allow us to raise or lower the elevation of the current vertex or all the vertices of the vertical alignment, when pressing any of these buttons the following window will appear.
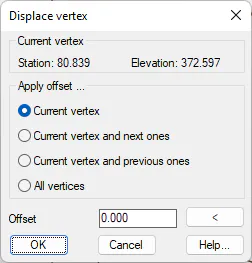
Current Vertex: Information about the vertex being edited.
Apply offset: Vertices to which offseting is applied.
Offset: Offset to apply to the selected vertex or vertices. Pressing the "<" button is specified graphically with an elastic line.
Calculate Volume
If we check this box, it will automatically calculate the total volume of cut and fill for the defined road. When any of the vertices is modified, if this box is checked, at this moment we will be able to see the result of the volume calculation of the change made in the active vertex.