
tcpMDT
Plot Memory - MDT26
 | Command to execute in the CAD |
|---|---|
Vertical menu | MDT26 > Plots > Utilities > Plot Memory |
Ribbon menu | Plots > Utilities > Parcel Memory |
Command line |
This command allows you to generate a Word report from a configurable template, automatically replacing the data of the designated plot (cadastral reference, area, cadastral borders, reference system, vertices, etc.). When the command is executed, a dialog will be displayed where the editable report data can be entered.
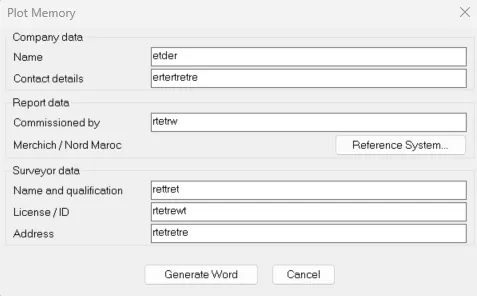
The Company data group contains the data that will appear as the header of the report.
Name. Company name.
Contact details. Contact information (phone, email, address).
The Report data group is used to specify the data linked to the commission.
Commissioned by. Name of the client who commissioned the report.
Reference System. Reference system used to compute the plot coordinates. By clicking the Reference System... button, the standard Aplitop SRC and Datum selector is opened (the same one used by the KML / Google Earth export). The selected SRC is displayed in the field and used to fill in the report.
The Surveyor data group contains the data of the surveyor who authored the report.
Name and qualification. Surveyor's name and professional qualification (for example, "Paco Cano, Surveyor").
License / ID. Member or license number.
Address. Professional address.
When the Generate Word button is clicked, the user will be prompted to designate the plot for which the report will be generated. The system then:
Locates the template in
config\<language>\BIM\informe_parcela.docx.Automatically replaces the tokens (
[FECHA],[RRCC],[SUPERFICIE],[SRC],[EMPRESA],[CONTACTO],[CLIENTE],[TECNICO_NOMBRE],[TECNICO_TITULO],[TECNICO_DIRECCION],[REFCN],[REFCE],[REFCS],[REFCO]) with the actual plot data and the editable fields from the dialog.Inserts a table at the position of the
[TABLA_UTM]marker with the UTM coordinates of each vertex (Name, X Coordinate, Y Coordinate, Length and Angle).Opens Microsoft Word with the completed document, ready to review, manually adjust any detail and save.
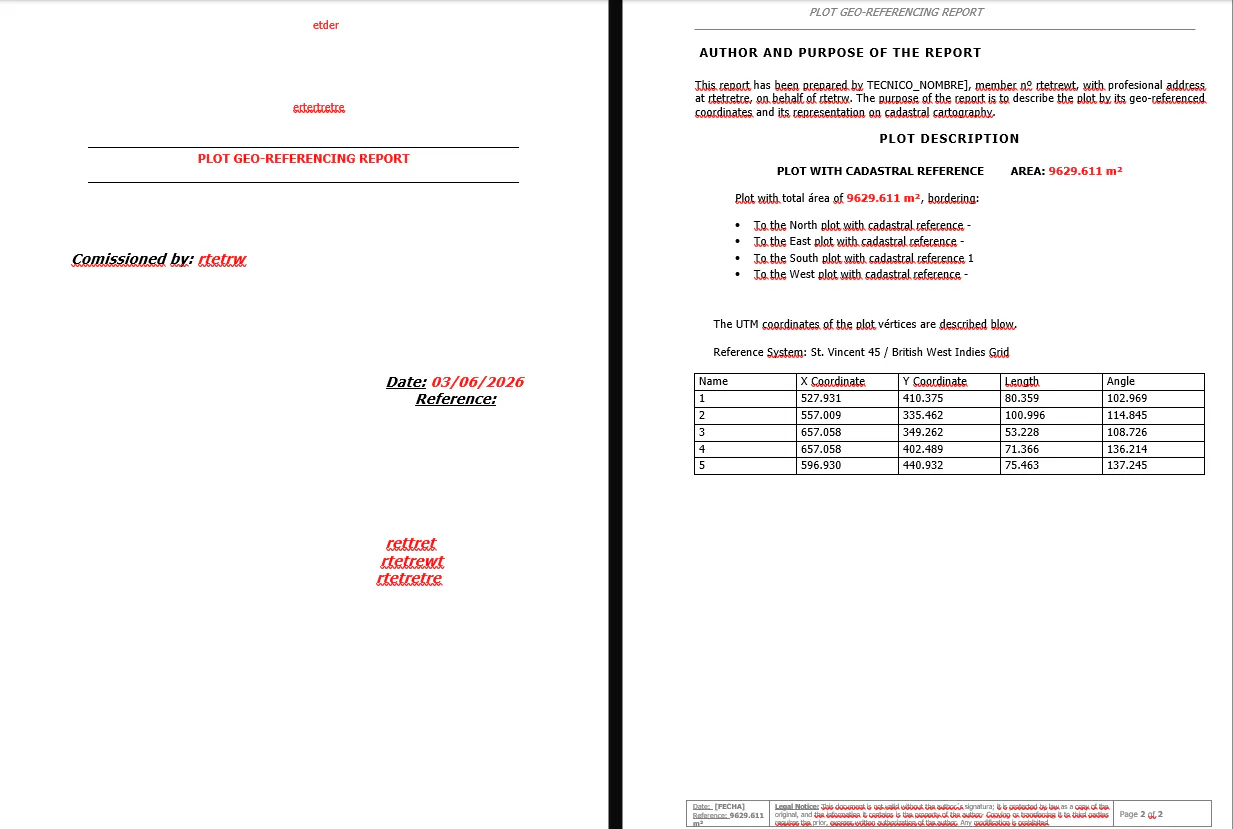
The template can be freely edited from Word to adapt it to the user's corporate identity (logos, typography, colours, footer, etc.), always keeping the [XXXX] tokens exactly as written in those places where the automatic data should appear.